
How It Works
All our Flash Video & Audio Players require a minimum of three files to work:
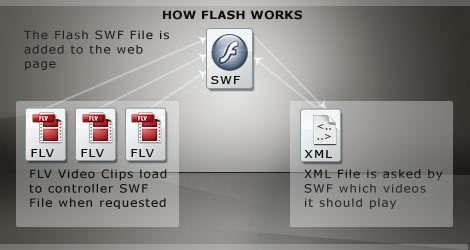
SWF Flash File - The SWF file is the 'controller' file and includes the skin and player functionality. This is the file you add to your webpage.
XML File - The XML File acts like a 'Playlist', telling the SWF File what Video (FLV) or Audio (MP3) Files it should play, and in what order.
FLV or MP3 Files - These are the actual media files that are loaded and played back by the player. A minimum of one is obviously required, but you can include as many as you wish.
Getting Up & Running - An Overview
When you download one of our player's you'll receive with it a working demo and detailed set-up instructions. Here however, is a basic overview of how to get things up & running:
1. Prepare Media Files - FLV (Video)/MP3 (Audio).
If you need to convert your video clips from their original formats (.mov, Mpeg, .wmv, etc) to FLV, there's plenty of software to help you do this.
The 'Riva FLV Encoder' is available for free. For details go to:
http://www.rivavx.com/?encoder
2. Reference Media Files in XML File.
The XML file you're supplied with has an obvious structure where you just insert the names of your media files:
<?xml version="1.0" encoding="iso-8859-1"?>

  <playlist>

  <video flv="musicPrem.flv" />

  <video flv="heronflyEdit.flv" />

  </playlist>
3. Add the Flash SWF File to your webpage.
The standard method for adding Flash to a webpage is to use the HTML 'OBJECT' Tag. We provide a code snippet that you can cut'n'paste to your webpage. A full explanation will be included with your download.